Shoutouts
Mountain West Ruby Conference Talk Video
My Mountain West Ruby Conference talk video is up! Thanks to Confreaks for the hard work to get these videos out!
Lessons Learned from Planning a Wedding in the "Digital Age"
For the last six months or so, my life has been consumed by non-ruby stuff. In June I got married and during the 10 months leading up to the event, the time I would have otherwise devoted to side projects and ruby learning, was entirely consumed by what my husband and I worked hard to make a very smooth and tech-savvy process. We learned many lessons along the way, and I have decided to share some words of wisdom with other technology hungry folks who may be planning a wedding as well.
Lesson 1: RSVP Cards are Necessary and a Website Form Doesn't Cut It
I thought I would save a few trees, spend a little less money on stamps and RSVP cards so I decided to make an online form for the people who had a computer and knew how to use it. I figured it would make it easier for my family and friends to RSVP and their card wouldn't get lost in the mail.
This brought up a few issues I didn't anticipate. First, my friends and family couldn't remember that they didn't RSVP yet because there was no card to send in — they had nothing to sit on their desk indicating that they hadn't RSVP'd yet. This memory lapse only got worse the more they procrastinated. Secondly, the form led to confusion about who was actually invited. Because the form tried to lend itself to all types of guests, they didn't know if they could have plus ones, etc.
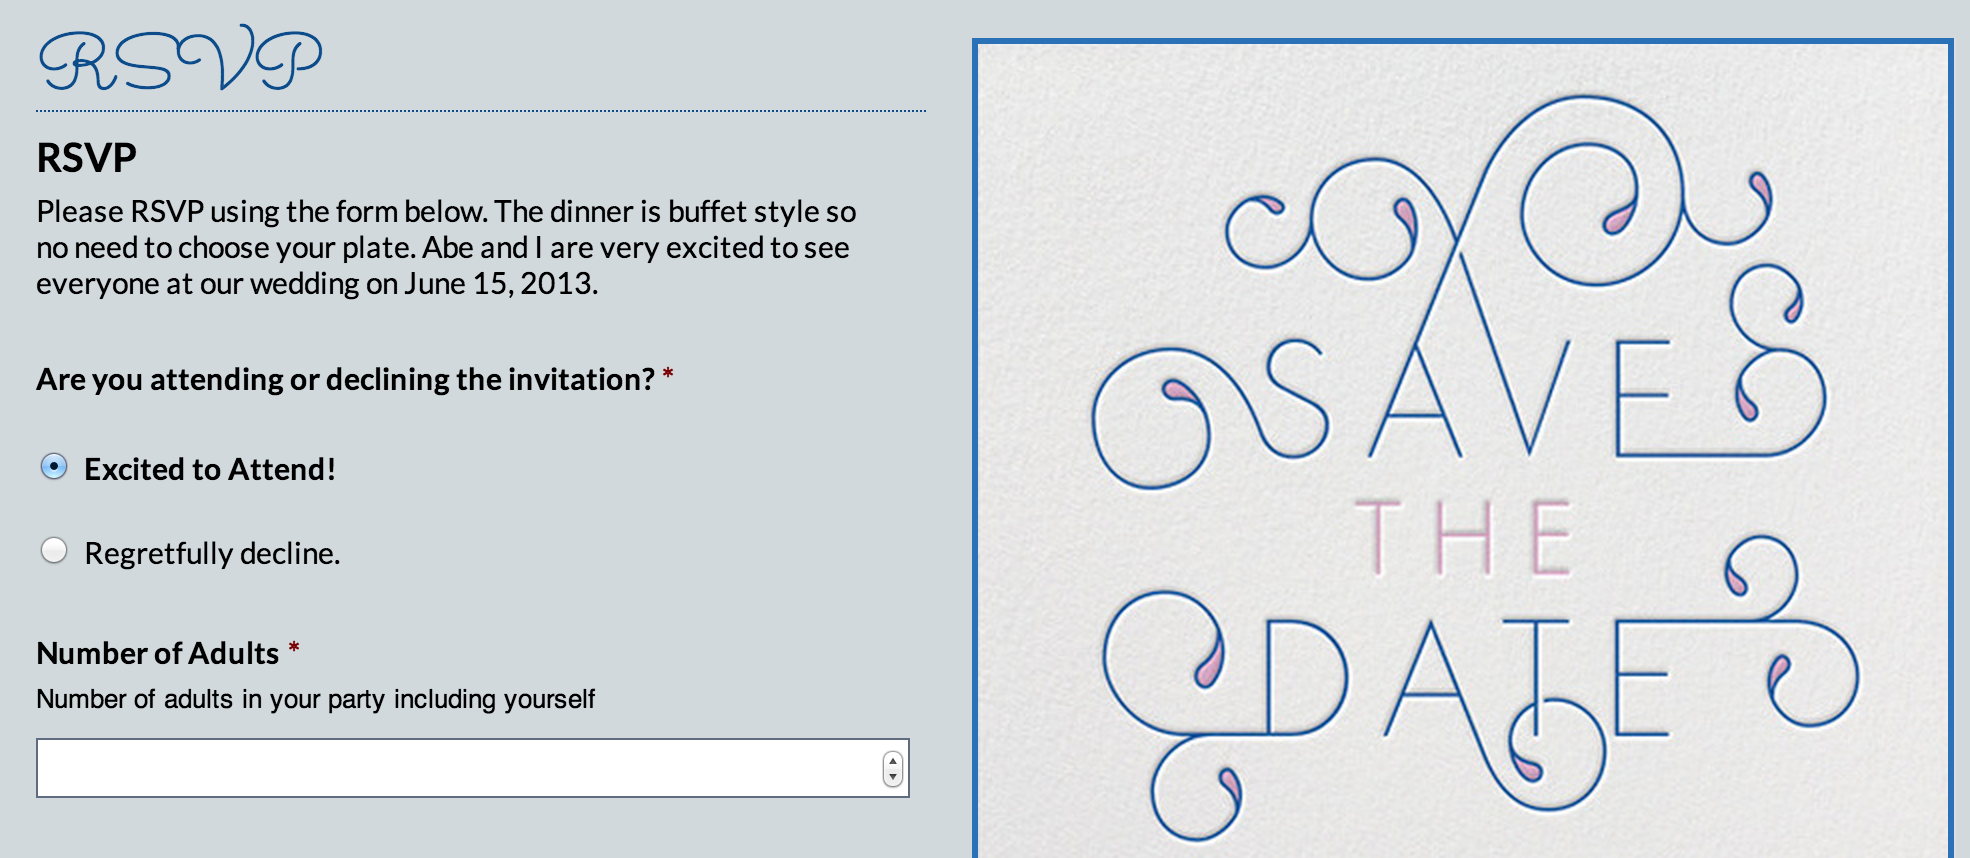
If you do use an RSVP form in lieu of RSVP cards, make sure to send them back a "thanks for RSVPing" so they're more likely to remember they already RSVP'd or add a reminder email for those who haven't filled out the form yet.
Lesson 2: Don't Give Your Email Address or Phone Number to Any Company Ever, Unless They Are One of Your Vendors
This one is just a good ordinary life lesson. Of course you can give your information to your vendors, but only after you've decided who your vendors are so they can't contact you when you ultimately decide to go in a "different direction".
I found that large corporate vendors tend to hire people who work only on commission and are desperate to make some kind of sale. As a result, I got countless phone calls and emails from people I never asked to get information from.
Many wedding sites say in their "Terms" (TheKnot for example) that even if you opt-out of them selling your information, they might do it anyway and the only way to stop them is to contact them directly. It's really disheartening that companies conduct themselves in this way.
Lesson 3: Definitely Use Trello or Another Project Management Tool for the Planning Process
Using Trello for wedding planning was one of the best decisions we ever made. Abe and I used it to assign each other tasks (ex. "Please call florist."), make sure we knew when deposits were due and who we had already paid. We even used it to organize our seating chart. Each family member/friend was assigned a color based on the side of the family they were associated with. This made it really easy to know who could sit with who.
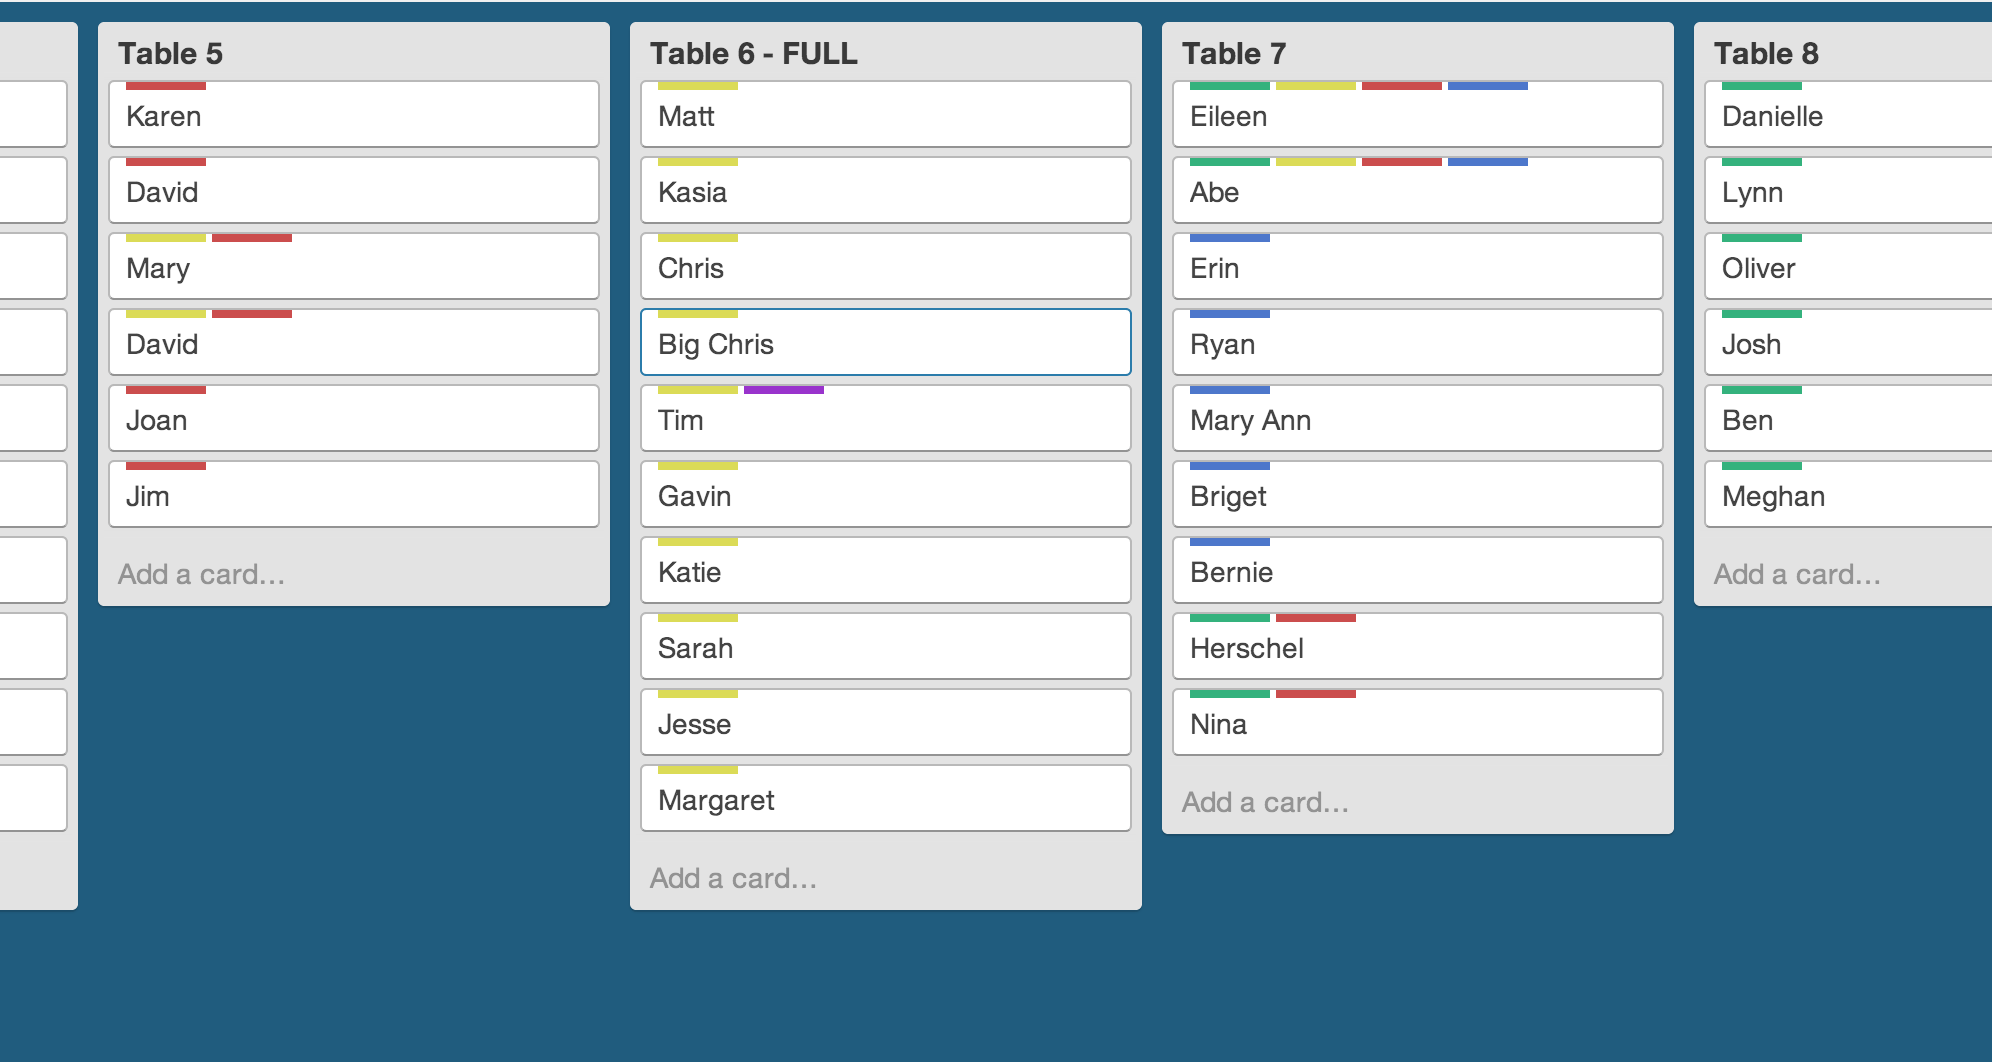
Trello has a really great drag and drop interface that makes it easy to organize projects or weddings. Abe goes into greater depth about this on his blog
Conclusions
Planning a wedding was stressful, but well worth the effort. I hope these tips help you plan your future wedding. Enjoy!
Also awhile back I added images to my blog, yay! I haven't gotten around to writing a post about it but hopefully pictures will become more common in my posts now that my life is returning to normal.
Setting Goals for the Coming Year
Every year at EMN we do performance evaluations sometime during the summer. Generally, they are pretty straight forward, but a question I was asked got me thinking;
"Where do I want to be in a year?"
Every year I amaze myself with the amount I've learned in the past year. But I've always done so without setting trackable goals where I can actually see my progress throughout the year. I personally find New Year's resolutions to be contrived and most give up because they set goals that don't have manageable steps. Changing oneself – whether that be on a personal or professional level – takes time.
Here are my manageable goals for the year:
- Make this blog better - mostly under the hood stuff. I am working on currently adding a sitemap , pretty permalinks, rss and fixing up my 400 & 500 pages. Also, want to add photos, pages, comments fleshing out the admin to be more of a CMS that I can distribute on a small scale.
- Improve the testing on the blog (I have tests but not for everything and I want to get better at TDD by increasing my code coverage)
- Finish the Ruby Koans to improve my TDD (by the way, Ruby Koans are awesome and I'm about 1/3 of the way to enlightenment)
- Contribute to at least 2 open source projects and release at least 1 open source project.
- Continue doing what I'm doing — learning new languages/frameworks, building awesome web applications, I'd like to spend more time with Sinatra, Emberjs, Backbonejs, RubyMotion, etc
- Don't forget to have fun and ensure I maintain a healthy work/life balance
- Write more in this blog. I've been writing at least once a month but I can do better since I'm learning new things
So, there you have it. My goals for the year. I'm sure they'll change, but now I can track my progress on my yearly goals.
I encourage you to create your own development goals for the year and at the end of the year determine whether you have reached or exceeded your goals.
Lots of Love for ActiveAdmin
I have been so heavily immersed in work projects that I haven't had the time to write posts about rails - or do much of anything else.
Recently, I have been using the ActiveAdmin gem for the websites I've been building with rails. We are rebuilding our company website with rails and an ActiveAdmin backend. ActiveAdmin is awesome, the documentation could use a little love, but other than that I have no complaints about the system. I do believe everyone should build a rails administration system from scratch at least once to ensure understanding of how authentication works.
I'm going to go over some of the basics of getting up and running with ActiveAdmin and then in later posts will go into more detailed instructions on more complicated things you may want the admin to do like model relationships and integration with paperclip.
Installation
To get started add activeadmin and meta_search to your Gemfile. Bundle install and begin development! Activate the default admin user model by generating the resource: rails generate active_admin:resource AdminUser. The default login information is admin@example.com/password.
Beginning Development
First, the admin user model must be configured. An important thing to note on installation is that all the fields for the user are visible including encrypted_password, reset_password_token, etc and if you try to update/add a user before changing the available fields you will get a "mass assignment" error. Find the admin_users.rb in app > admin and add the following:
ActiveAdmin.register AdminUser do
  index do
    column :id
    column :email
    column :full_name do |field|
      "#{field.first_name} #{field.last_name}"
    end
    column :last_sign_in_at
    default_actions
  end

  show do
    attributes_table do
      row :id
      row :full_name do |field|
        "#{field.first_name} #{field.last_name}"
      end
      row :email
      row :last_sign_in_at
      row :sign_in_count
    end
  end

  form do |f|
    f.inputs "Edit User" do
      f.input :first_name
      f.input :last_name
      f.input :email
      f.input :password
      f.input :password_confirmation
    end
    f.buttons
  end

  filter :id
  filter :email
end
You'll notice I've added extra fields to the db, namely a first_name and last_name to create full_name. This file changes the main views in the administration interface — the index view (table of users), the show view (each user's settings), and the form (updating/adding users to the admin panel).
Be sure to update your model to include validations, messages and relationships.
Adding new models is as simple as generating a model and a resource. If you want to create a model that isn't updated through the ActiveAdmin interface, create a has_many join table model (ex, categorizations), but leave out the resource generation.
And that's all you need to get started, very simple gem to use. Although I could get a lot more in-depth about the features of ActiveAdmin I'm going to pause here. I encourage you to play around with it, the ease of use makes development even more fun. It's great to not have to worry about designing your admin interface for fast development.
My First Week with a Sit-Stand Desk
Although this pos is not related to Rails I thought it as valid becasue it's about the culture of technology companies and keeping that culture from being stale.
And sitting was getting stale. In fact, sitting had been stale for me for quite awhile because for a year and a half I have had on and off excurciating back pain that leads to migraine style headaches ad massive amounts of crankiness, not to mention the productivity you lose when all you can think about is the amount of pain you're in.
So this week I started with an ergotron sit-stand style desk. I would post a picture but I have yet to install paperclip on my blog for adding posts (I really should get to that).
The nice thing about this style desk is it can move up and down to be at the perfect height for your hands or so if you're tired of standing you can sit easily without needing to purchase a higher chair.
The company has many different styles from dual monitor to monitor and laptop, something for everyone. It attaches to an existing desk by a clamp which worked really well for my office because we have built in work stations that came with the office. It didn't require any decontruction of the stations.
I was surprised to find that I could stand almost all day. Of course I get fidgetty, but I was like that when I was sitting too. I don't know if I can say yet that I think better, but I am definitely less tired and in less pain. Good shoes are really important becasue my heels start to hurt if I'm not wearing supporive and comfortable ones. I encourage you to try it out if you can. I'll most iikely be purchasing a standing desk mat for computing barefoot so my heels don't hurt as much.
Installing Airbrake for Your Rails App
What is Airbrake
In addition to New Relic I have also added Airbrake to my blog. Again, Airbrake is very simple to add add to any Rails App.
The Airbrake App tells you if any of your projects throw and error, and also notifies you which of your app environments did so. You have the option of the error notifying you via email, only receive emails for the production environment or to participate in Airbrake's beta program.
It also has Lighthouse & Github integration as well as tracking your deployments which is nice and convenient.
Installation and Use
Adding the Airbrake app is easy and I'll even go over an error and solution that occurred for me. First create an airbrake account and create your first project. When you create the project directions for adding Airbrake to your app will be visible.
Add airbrake to your Gemfile. I found this did not play nicely when I put the app in only my production environment.
gem 'airbrake'
Run bundle install. Then run script/rails generate airbrake --api-key YOUR_API_KEY_HERE. You can get your api key from that first screen when you create your first project. If this runs successfully you will see the airbrake test run in your terminal, followed by your configuration options which contain your api key, etc.
      append  config/deploy.rb
      create  config/initializers/airbrake.rb
         run  rake airbrake:test --trace from "."
** Invoke airbrake:test (first_time)
** Invoke environment (first_time)
** Execute environment
** Execute airbrake:test
Configuration:
Now if you're using Capistrano you're probably wondering if there is anything special you need to do for your deploy. The good news is that Airbrake will add require 'airbrake/capistrano' to your deploy.rb automatically. The bad news is that my capistrano script broke after the addition of airbrake. Previous apps we have Airbrake installed on run fine so I'm not sure if it's certain versions of gems, ruby or rails that throws the errors.
If you see an error that says `require': no such file to load -- rvm/capistrano (LoadError)" then you probably have the same problem I have. After a little bit of research I found others had the same problem and reported that removing require './config/boot' from the deploy.rb fixed the problem. Once I removed this it ran fine and airbrake noted my deploy. The problem I found is a know issue reported on github as Issue #26 - if you'd like to follow the progress of this error you can read up on it here.
Installing New Relic for Your Rails App
What is New Relic?
New Relic is a performance management system that our company just started using to monitor some of our larger apps. Since this app occasionally drops mysql connection (I'm thinking it's related to Unicorn) we're using it as a test case.
By using New Relic you can get real-time browser performance, app performance, database performance, email notifications. And on top of being a great resource it looks awesome. Some really nice design there.
Installation and Use
Installation for Rails Apps is easy. Add the gem to your Gemfile inside your production group.
gem 'newrelic_rpm'
When you're done with that add newrelic.yml Inside your config/ folder inside your app. You can get the default settings from the github project.
You'll need a license key and to change your group's based on your configurations if you don't want the default options.
Once deployed New Relic automatically recognizes your Rails App and begins monitoring it. It monitors who is visiting your site and from what country as well as all the processes it is running. Definitely worth checking out.
The Footnotes Plugin for Textmate
Around the beginning of the year I decided to watch every Railscast tutorial. I know what you're thinking — that this was a "New Year's Resolution". Well that's simply not true. It just appears to be one. I resolved to do that way before the New Year, it just so happened that on January 3rd is when I had time to start.
Well some people have said, why watch every one? They are old and from 2007 and some aren't relevant anymore. That may be true, but at EMN we have some legacy Rails sites that I didn't build but might have to one day fix, and it helps to know what has changed from Rails 2 to Rails 3, etc.
I've also learned some really great things and tips. One in particular is the footnote plugin for textmate which links the error messages in Rails to where they appear in your code. In your footer it also describes the SQl calls & queries, and analyzes the speed, shows the CSS and HTML and everything you might want to inspect for that code. The video that describes it is "The Stack Trace" and although the method for installing the plugin shown in the video no longer works you can download it from github and follow the installation instructions there. It needs to be installed for each app and added to your .gitignore because this plugin should only be used in development mode.
Happy coding!
Hello world
I just launched this blog and hope to have some informative posts about what I'm learning up soon.
A shout out to the only reasons this blog is running:
Ruby
Ruby on Rails
Capistrano
Nginx
Unicorn
Code I post on this site will be gists from Github, and I couldn't have built this without RailsCasts.