Open Source
HTTP2 Early Hints
Update: The PR’s discussed in this blog post have been merged. You can try out Early Hints by using Rails and Puma master. You’ll need to also use Arel master until Rails 5.2 is released.
Recently I’ve been working with Aaron Patterson on implementing the HTTP2 Early Hints.
The spec for Early Hints is still in draft but explains the requirements for implementation. In order to start preparing Rails and Rack for HTTP2 we’ve implemented Early Hints handling in Puma and Rails.
As of today (September 29, 2017) the pull requests haven’t been merged but we’d love for you to try them out if you’re interested in implementing Early Hints. A lot of this work is somewhat experimental so try it on production at your own risk.
In this post I’ll go over what early hints are, what the spec expects, and finally how to use the two pull requests to test it out on your own application.
Early Hints, what huh?
Early Hints is a new HTTP status code that allows your application to send links to assets that you would like to load early. For example if you have a stylesheet and javascript file included in your Rails application you may want to tell the client about them early so it can start downloading them.
The Early Hints spec contains header Links with references to those resources that you need downloaded early. An example response from the server looks like this:
 HTTP/1.1 103 Early Hints
 Link: </style.css>; rel=preload; as=style
 Link: </script.js>; rel=preload; as=script

 HTTP/1.1 200 OK
 Date: Fri, 26 May 2017 10:02:11 GMT
 Content-Length: 1234
 Content-Type: text/html; charset=utf-8
 Link: </style.css>; rel=preload; as=style
 Link: </script.js>; rel=preload; as=script
There are 2 responses, one for Early Hints that sends the linked resources and one for the final request that should also include the same links.
For the Link header, Link: </style.css>; rel=preload; as=style the style.css is the path to the css file, rel does not change and should be preload, and as is the type of resource you’re sending. The as is not required, but is useful for content-security policies.
While HTTP/1.1 can accept a 103, a server might not actually send the hints unless it absolutely knows they will be accepted. HTTP/2 is less likely to have this problem as handling of response headers doesn’t affect how the response body is determined (as noted in the spec.
Implementing Early Hints with Puma and Rails
The Puma PR and Rails PR are both a work in progress so they are likely to change before we merge them into their respective projects.
Below I’ll describe how you can try these two out in your Rails app. First make sure you’re using the Rails and Puma gems set to the branch for these PRs’
# Gemfile

gem 'rails', git: 'https://github.com/eileencodes/rails', branch: 'early-hints'
gem 'puma', git: 'https://github.com/eileencodes/puma', branch: 'early-hints'
gem 'arel', git: 'https://github.com/rails/arel'
Next you’ll need a proxy that can handle HTTP/2.
Install h2o via homebrew or the method you need for your computer. I used homebrew with brew install h2o.
Find the h2o config file (mine is in /usr/local/etc/h2o/h2o.conf and update it with the following:
hosts:
  "localhost":
    listen:
      port: 9090
      ssl:
        certificate-file: /usr/local/etc/h2o/localhost.crt
        key-file: /usr/local/etc/h2o/localhost.key
    paths:
      "/":
        proxy.reverse.url: "http://127.0.0.1:3000/"

access-log: /usr/local/var/h2o/access-log
error-log: /usr/local/var/h2o/error-log
Next you’ll need a “fake” certificate so you can do HTTPS requests with localhost. Otherwise Early Hints won’t work. See this post for more information on the following.
Run this command:
openssl req -x509 -nodes -days 365 -newkey rsa:2048 -keyout localhost.key -out localhost.crt
And follow the prompts. I hit enter for everything. Then move your certificate and key into your h2o folder since that’s where the config is looking. If you want the cert to live somewhere else, update your h2o.conf with that new path.
Now start the h2o server with the config: h2o -c h2o/h2o.conf
And start your Rails server (if it’s a Rails 5 app you will automatically be using Puma. This will not work if you’re not using the Puma branch I linked above): bin/rails s --early-hints
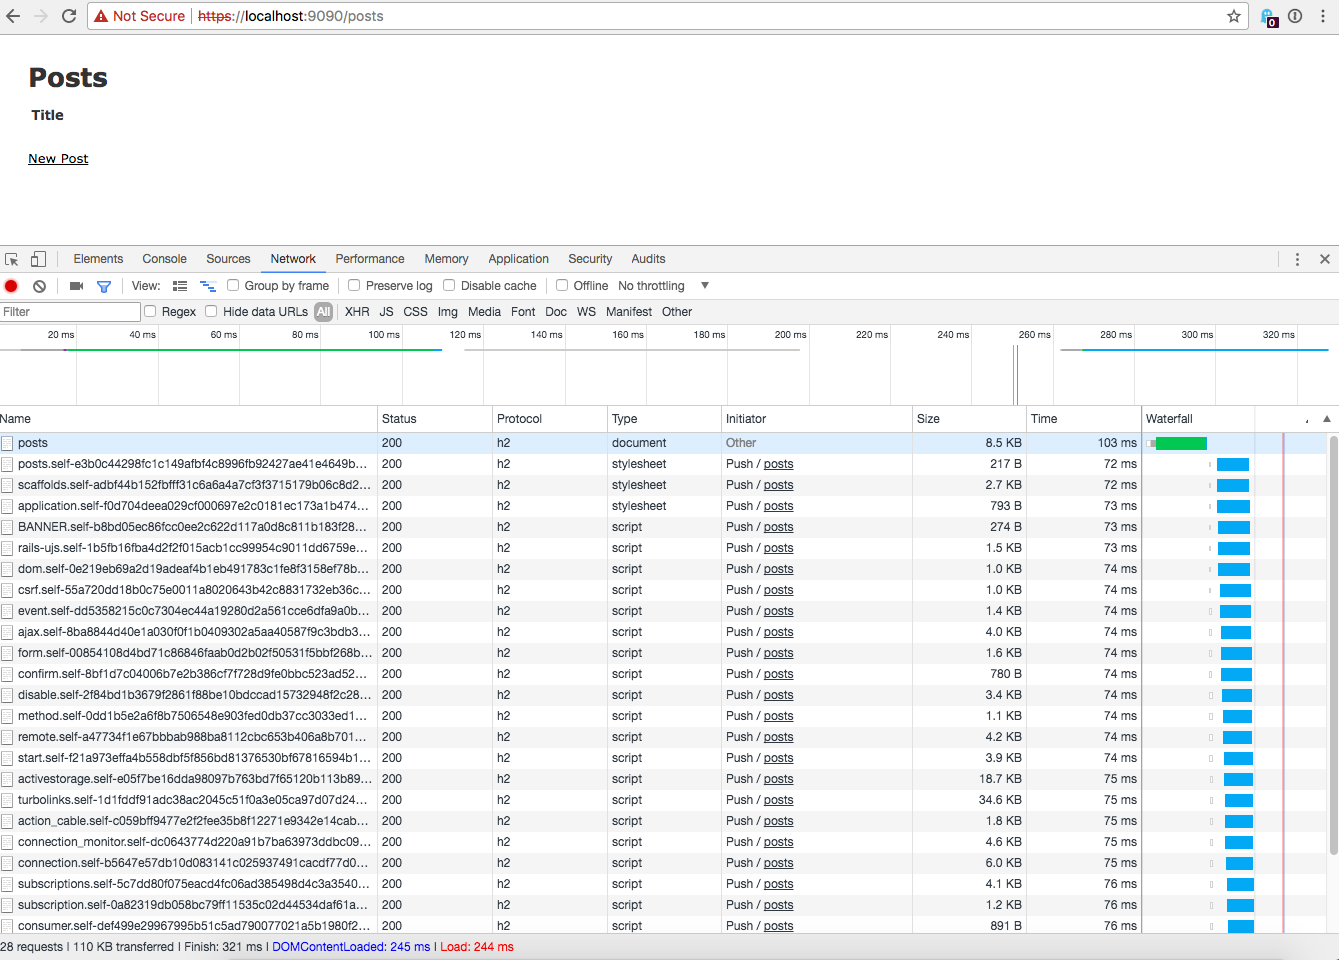
Open Chrome and go to https://localhost:9090/someurl replacing someurl with a URL you know uses a javascript_include_tag or a stylesheet_link_tag because that’s the way Early Hints is currently implemented in Rails.
Open the Chrome dev tools and go to the network tab. From there you should see Push / posts where posts is the URL you entered under the “Initiator” column. Below is a screenshot of my Chrome dev tools showing the Early Hints loading. If you click the image to load the full side it is easier to view.
Getting Your Local Environment Setup to Contribute to Rails
At RailsConf I’ll be leading a workshop on contributing to Ruby on Rails called “Breaking Down the Barrier: Demystifying Contributing to Rails”. My goal is to help you be confident in your ability to contribute to Rails. I’ll be focusing on contributing guidelines, advanced git commands, and traversing unfamiliar source code. I’ve allotted 90 minutes for the workshop so in order for you to get the most out of it you should have your system ready. In this post I’m going to go over the basics of getting set up.
Technically, the easiest way to get Rails running locally is to use the supplied VM. I prefer to have it running on my local machine, but if you’re using Windows I highly recommend using the VM. Although the VM is referred to the “easy way”, you likely already have 50% of the things you need installed on your system already if you’re actively developing Rails applications. If you do decide to use the VM you can skip these instructions. Please contact me on eileencodes to let me know if the VM directions are wrong. Or better yet, if you figure it out send a pull request!
Let’s get started with the basics of getting set up!
Ruby Manager
When working with Rails it’s likely you’ll be using a different Ruby version than you use in your production applications. It’s best to use Rails master with the most up-to-date version of Ruby. Currently, you can’t use Rails master / future Rails 5 without Ruby 2.2.2. You probably already have a way to have multiple rubies installed on your machine with either rbenv, rvm or chruby.
I personally use rbenv but I’ve used rvm in the past and hear good things about chruby. It really doesn’t matter which one you use as long as you can have multiple rubies installed on your machine.
Once you have that set up, install Ruby 2.2.1 2.2.2 (2.2.1 had a security vulnerability). Don’t forget if you have a new version of Ruby you’ll need to install bundler before you run bundle install on the Rails repo.
Fork & Clone Rails
Now we’ll get the Rails source code set up. First go to [github.com/rails/rails][rails-repo]{:target=”_blank”} and click “fork”. Some developers prefer to clone the main Rails repo and set up their fork as an upstream, but unless you have push rights to Rails (a commit bit) I don’t think this really makes sense. In my opinion having origin set as your repo works best so this guide is going to show you my preferred method.
Checkout your version of Rails to your local machine:
$ git clone git@github.com/your-fork/rails.git
You’ll need to get Rails master main repo as an upstream to your Rails. To do this simply run:
$ git remote add upstream https://github.com/rails/rails.git
Anytime you want to pull changes from Rails master into your master do:
$ git pull --rebase upstream master
$ git push origin master
Here you are pushing to your origin so your remote origin is always up-to-date with your master branch. Don’t work on your master branch and send PR’s from there. Always create a new branch. That way you can be working on multiple patches and your master is always clean and ready to checkout a new branch from. Pushing to your origin master also makes it easy to reset any of your branches to master without having to re-pull changes from upstream Rails.
Don’t forget to add a .ruby-version file to your Rails repo, but be sure not to check this in. I have a .gitignore_global file that sits in my home directory and ignores all .ruby-version files. Then you should run bundle install.
Databases
Ok now that you’ve got the Ruby and Rails source, you’ll need to get a few more things installed before you can start running Rails tests. And the most important of those things is databases!
It’s not really a requirement that you have ALL the databases installed but it’s a good idea to have the default databases that the Active Record supports; SQLite3, MySQL, and PostgreSQL. This will help you test the main adapters that are supported in Rails. It’s also a good idea if you’re working on any SQL specific parts of Active Record; you want to be sure you aren’t negatively changing the behavior of those other databases.
How you install databases is up to you. As a OS X user I install them with homebrew and follow the instructions output after installation. Remembering all the start/stop commands for databases is a pain though so I use LaunchRocket to control this. It’s a OS X preference pane to manage databases installed with homebrew. Additionally, you’ll need memcached for some ActionDispatch and ActionController tests.
Once you have the necessary databases installed you’ll need to create the databases and users required by the Rails tests.
MySQL
First create the users
$ mysql -uroot -p

mysql> CREATE USER 'rails'@'localhost';
mysql> GRANT ALL PRIVILEGES ON activerecord_unittest.*
       to 'rails'@'localhost';
mysql> GRANT ALL PRIVILEGES ON activerecord_unittest2.*
       to 'rails'@'localhost';
mysql> GRANT ALL PRIVILEGES ON inexistent_activerecord_unittest.*
       to 'rails'@'localhost';
Then create the databases
$ cd activerecord
$ bundle exec rake db:mysql:build
PostgreSQL
If you’re a Linux user create the user by running:
$ sudo -u postgres createuser --superuser $USER
If you’re an OS X user run:
$ createuser --superuser $USER
And then create the databases:
$ cd activerecord
$ bundle exec rake db:postgresql:build
Creating and Destroying
It’s also possible to create both MySQL and PostgresSQL databases at the same time by running:
$ cd activerecord
$ bundle exec rake db:create
And you can destroy the databases and start over with:
$ cd activerecord
$ bundle exec rake db:drop
Running the Tests
Now that you have Ruby, the Rails source code, and the databases installed it’s time to run the tests. Now don’t just run rake test in the Rails root directory because you will be there all day waiting for railties tests to finish. Simply cd into the library you want to test and run:
$ rake test
To run Active Record tests, be sure to include the database adapter you want to test or else sqlite3, mysql, mysql2, and postgresql adapter tests will all run. To run tests for specific adapters do the following:
$ bundle exec rake test:sqlite3
$ bundle exec rake test:mysql
$ bundle exec rake test:mysql2
$ bundle exec rake test:postgresql
And don’t forget all these commands are available if you run rake -T in the directory you’re in.
See You at the Workshop
I’d tell you more about contributing to Rails but then I would have nothing to talk about at the workshop! I know it will be a lot of fun and you’ll learn tons. To read more about my workshop go to the RailsConf website.
If you have any issues at all getting set up ping me on twitter at eileencodes and I’ll do my best to point you in the right direction.